Red White and Blue Popsicles
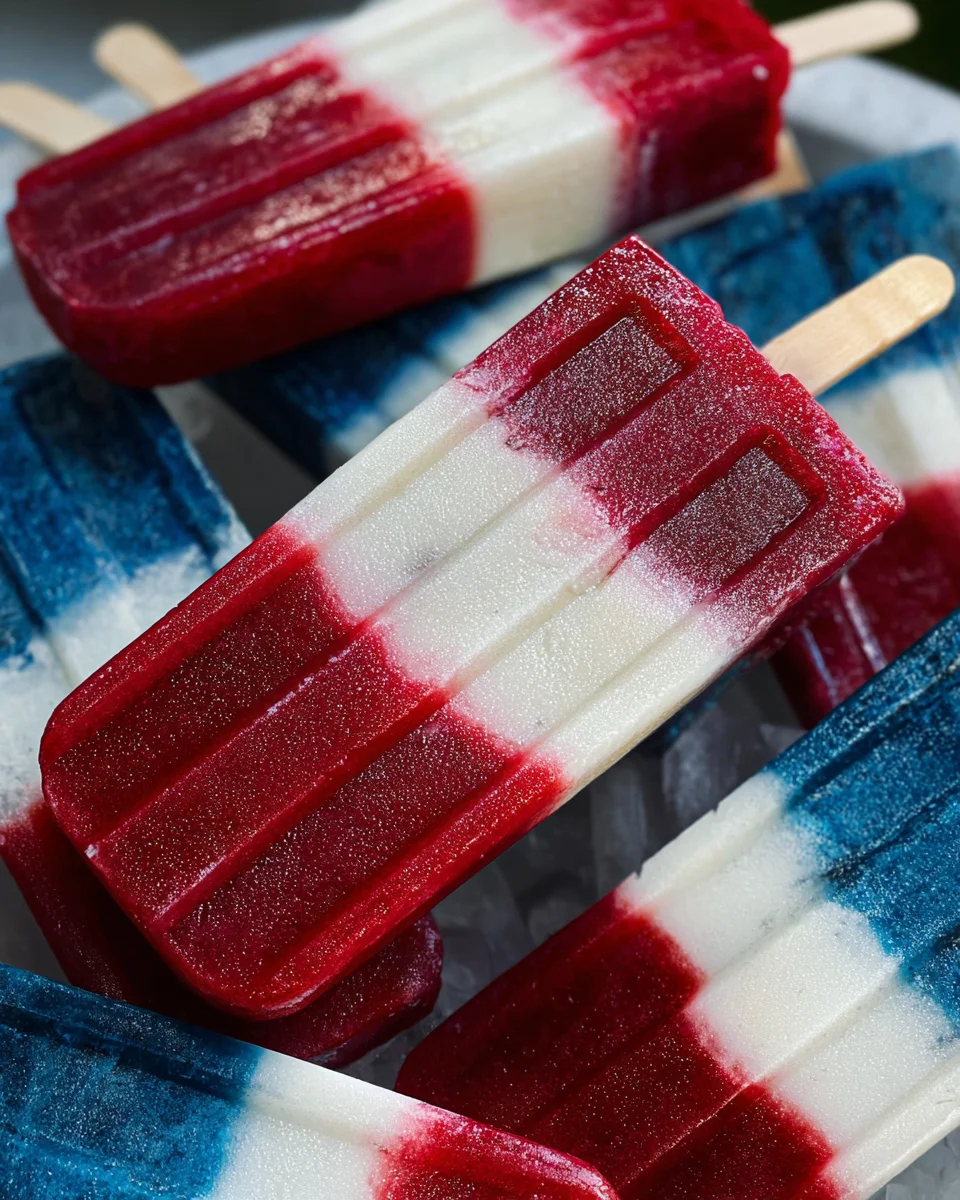
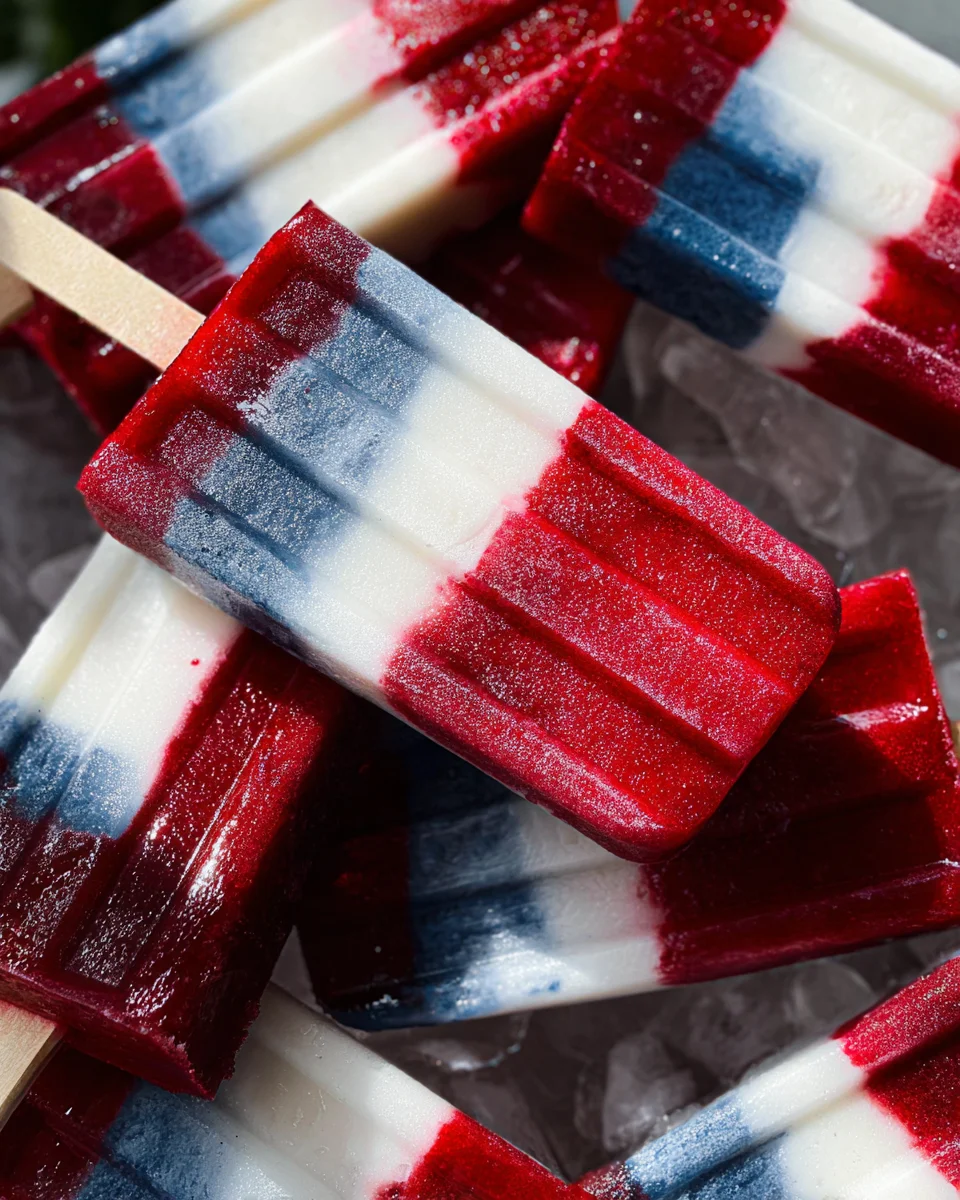
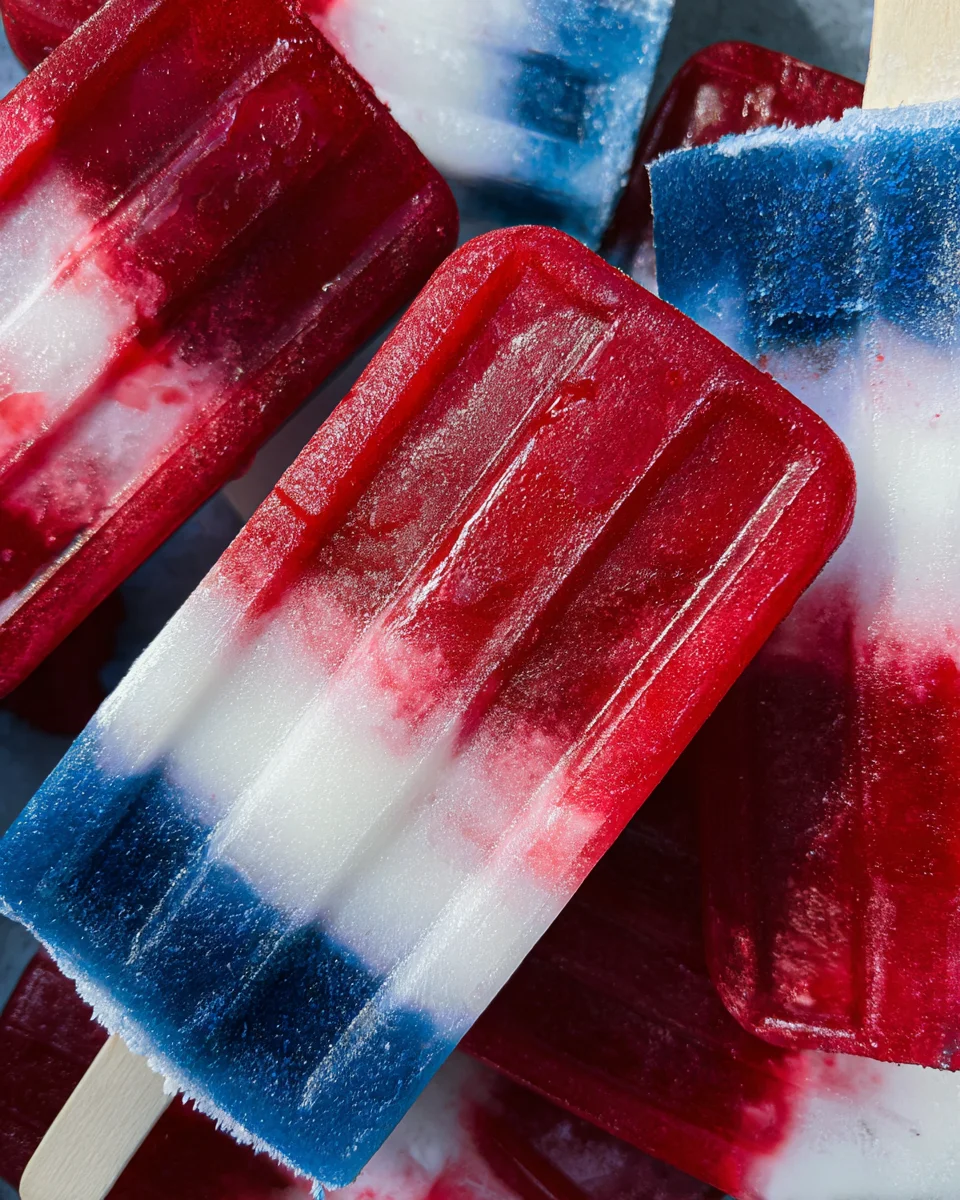
Red White and Blue Popsicles are the perfect summer treat, combining fresh fruit and creamy layers for a deliciously refreshing experience. These vibrant popsicles are not only visually appealing but also make an excellent choice for patriotic celebrations, family gatherings, or simply a hot day by the pool. Their unique blend of flavors and colors will delight both kids and adults alike!
Why You’ll Love This Recipe
- Fun to Make: These popsicles are simple to prepare, making them a great activity for kids and adults.
- Healthy Ingredients: Packed with fruit and coconut milk, they serve as a nutritious snack without sacrificing taste.
- Versatile Flavors: Customize your popsicles by adjusting the sweetness or adding different fruits based on your preferences.
- Eye-Catching Presentation: The striking red, white, and blue layers make these popsicles a standout at any gathering.
- Perfect for Any Occasion: Whether it’s the 4th of July or a sunny afternoon, these treats fit right in.
Tools and Preparation
Gathering the right tools ensures that making these Red White and Blue Popsicles goes smoothly. Here’s what you’ll need:
Grab This Chef Knife Now - Almost Gone!
- Stays Razor-Sharp: Ice-hardened blade keeps its edge longer than ordinary knives
- Superior Grip Control: Unique finger hole design gives you perfect balance and safety
- Built to Last a Lifetime: Premium stainless steel blade with elegant beech wood handle
Customer Reviews ★★★★★
Essential Tools and Equipment
- Ice pop molds
- High-speed blender
- Measuring cups
- Spoon for mixing
Importance of Each Tool
- Ice pop molds: Essential for shaping your popsicles perfectly; they create fun shapes that are sure to impress.
- High-speed blender: Ensures smooth blending of ingredients, giving you that creamy texture in every layer.
Ingredients
For the Red Layer
- 1 cup raspberries
- 1 tbsp maple syrup (optional)
- 1-2 tbsp water
For the White Layer
- 1 cup canned coconut milk
- 1 tbsp maple syrup (optional)
For the Blue Layer
- ¼ tsp blue spirulina powder
- 1 cup coconut milk
- 1 tbsp maple syrup (optional)
- ¼ cup blueberries (optional, will turn purple blue if added)
How to Make Red White and Blue Popsicles
Step 1: Prepare the Red Layer
Combine the raspberries, maple syrup (if using), and water in a high-speed blender. Blend until very smooth. Pour about 1 ½ tablespoons of this mixture into each ice pop mold. Place the mold in the freezer to set for at least 30 minutes.
Step 2: Create the White Layer
While the red layer is freezing, rinse your blender and combine 1 cup canned coconut milk with 1 tbsp maple syrup. Blend until smooth. Once the red layer has set, add a heaping 1 – 1 ½ tablespoons of this white mixture into each mold as your middle layer. Return the molds to the freezer for at least 2 hours.
Step 3: Make the Blue Layer
To prepare the blue layer, combine 1 cup coconut milk, ¼ tsp blue spirulina powder, and 1 tbsp maple syrup in your blender. Blend until fully combined. Remove the molds from the freezer once the white layer is set. Carefully add this blue mixture on top of each mold. Insert a popsicle stick into each one.
Step 4: Freeze Until Firm
Place the molds back in the freezer and let them freeze until firm, which should take about 5 hours.
Step 5: Serve Your Popsicles
To remove your Red White and Blue Popsicles from their molds easily, run them under hot water for about 10 seconds. Serve frozen and enjoy! Store any remaining popsicles in the freezer for up to a month.
How to Serve Red White and Blue Popsicles
Serving your Red White and Blue Popsicles can be a fun and festive experience, especially during summer gatherings or patriotic celebrations. Here are some creative ways to enjoy your frozen treats that will surely impress your guests.
On a Festive Plate
- Arrange popsicles on a colorful platter surrounded by fresh fruit for a vibrant display.
- Use star-shaped cookie cutters to cut watermelon or cantaloupe for added flair.
With Whipped Cream
- Add a dollop of whipped cream on top of each popsicle for a creamy contrast.
- Drizzle with chocolate or berry sauce for an extra sweet touch.
As Part of a Dessert Bar
- Create a DIY dessert bar where guests can assemble their favorite toppings.
- Include options like crushed graham crackers, nuts, or sprinkles to customize each popsicle.
In Fun Drink Pairings
- Serve popsicles alongside refreshing beverages like lemonade or iced tea.
- For adults, pair them with a light cocktail or sparkling wine for a sophisticated twist.
How to Perfect Red White and Blue Popsicles
To ensure your Red White and Blue Popsicles turn out beautifully, consider these helpful tips. They will enhance both the appearance and taste of your frozen treats.
- Use ripe fruit: Choosing ripe raspberries and blueberries will provide natural sweetness and vibrant colors.
- Layer carefully: Pour each layer slowly into the molds to create distinct color separation.
- Freeze thoroughly: Allow each layer to freeze completely before adding the next one for best results.
- Experiment with flavors: Try adding other fruits or flavor extracts for unique variations.
- Adjust sweetness: Taste the fruit mixtures before freezing and adjust maple syrup according to your preference.
- Store properly: Keep popsicles in an airtight container in the freezer to prevent freezer burn.
Best Side Dishes for Red White and Blue Popsicles
To complement your delightful Red White and Blue Popsicles, consider pairing them with these delicious side dishes. Each side will add more variety to your summer spread.
- Grilled Corn on the Cob: Sweet corn grilled to perfection makes a great summer side dish that everyone loves.
- Caprese Salad Skewers: Fresh mozzarella, basil, and tomatoes drizzled with balsamic glaze offer a refreshing bite.
- Watermelon Feta Salad: A mix of juicy watermelon cubes, feta cheese, and mint provides a sweet and salty contrast.
- Veggie Platter with Hummus: Crisp vegetables served with hummus make for healthy snacking between popsicle bites.
- Mini Quiches: These bite-sized savory treats are perfect for adding protein while keeping it light.
- Fruit Salad: A colorful mix of seasonal fruits enhances the fruity theme of the popsicles while being refreshing.
Common Mistakes to Avoid
Making Red White and Blue Popsicles can be a fun activity, but there are common mistakes that can affect the outcome. Here are some pitfalls to steer clear of:
- Using frozen fruits: Fresh fruits yield better flavor and texture. Always opt for fresh ingredients when making your popsicles.
- Not blending well: A smooth blend is crucial for even layers. Blend each layer thoroughly to avoid chunks in your popsicles.
- Skipping freezing time: Patience is key! Ensure each layer is fully frozen before adding the next to prevent them from mixing.
- Ignoring measurements: Accurate measurements help maintain the right consistency and flavor balance. Use measuring spoons and cups for precision.
- Using low-quality molds: The right molds make a difference in shape and ease of removal. Invest in good quality ice pop molds for best results.
Storage & Reheating Instructions
Refrigerator Storage
- Store leftover popsicles in an airtight container in the refrigerator for up to 1 week.
- Keep them away from strong odors to maintain their fruity flavor.
Freezing Red White and Blue Popsicles
- Place the popsicles in a freezer-safe container for up to 1 month.
- Wrap them individually in plastic wrap to prevent freezer burn.
Reheating Red White and Blue Popsicles
- Oven: This method isn’t suitable for popsicles; they will melt rather than reheat.
- Microwave: Set on low power for 5-10 seconds just until slightly softened.
- Stovetop: Not recommended, as it will cause melting rather than reheating.
Frequently Asked Questions
How long do Red White and Blue Popsicles take to freeze?
It typically takes about 5 hours for the popsicles to freeze completely after all layers have been added.
Can I use other fruits for these popsicles?
Absolutely! You can substitute raspberries with strawberries or cherries, and blueberries can be swapped for blackberries.
Are Red White and Blue Popsicles healthy?
Yes! These popsicles are made with natural ingredients like fruits and coconut milk, making them a nutritious treat.
What if I don’t have blue spirulina powder?
You can use natural food coloring or simply omit it. The popsicles will still taste delicious!
Can I make these popsicles vegan?
Yes! All the ingredients used are vegan-friendly, making these popsicles perfect for anyone following a plant-based diet.
Final Thoughts
These Red White and Blue Popsicles are not only refreshing but also visually stunning, perfect for summer gatherings or patriotic holidays. Their versatility allows you to get creative with flavors and colors, so feel free to customize them with your favorite fruits or add-ins. Enjoy this delightful treat that brings joy to every bite!
Red White and Blue Popsicles
- Total Time: 0 hours
- Yield: Makes about 6 popsicles 1x
Description
Experience the joy of summer with our vibrant Red White and Blue Popsicles! This delightful treat combines layers of fresh fruit and creamy coconut milk, making it a perfect snack for hot days, family gatherings, or patriotic celebrations. Not only are these popsicles visually stunning, but they’re also healthy and fun to make with kids. With customizable flavors and a refreshing taste, these layered popsicles will be a hit at any occasion. Enjoy the burst of fruity goodness while keeping cool this summer!
Ingredients
- 1 cup raspberries
- 1 tbsp maple syrup (optional)
- 1–2 tbsp water
- 1 cup canned coconut milk
- ¼ tsp blue spirulina powder
- 1 cup coconut milk
- 1 tbsp maple syrup (optional)
- ¼ cup blueberries (optional, will turn purple blue if added)
Instructions
- Blend raspberries, optional maple syrup, and water until smooth. Pour into ice pop molds and freeze for at least 30 minutes.
- Rinse the blender and combine coconut milk with optional maple syrup; blend until smooth. Add this mixture as the second layer and freeze for at least 2 hours.
- Blend coconut milk, blue spirulina powder, and optional maple syrup for the blue layer. Add on top of the white layer in molds and insert popsicle sticks.
- Freeze until firm, about 5 hours. To serve, run molds under hot water for easy removal.
- Prep Time: 15 minutes
- Cook Time: N/A
- Category: Dessert
- Method: Freezing
- Cuisine: American
Nutrition
- Serving Size: 1 popsicle (80g)
- Calories: 70
- Sugar: 11g
- Sodium: 10mg
- Fat: 3g
- Saturated Fat: 2g
- Unsaturated Fat: 1g
- Trans Fat: 0g
- Carbohydrates: 12g
- Fiber: 2g
- Protein: 1g
- Cholesterol: 0mg

